If you don't have a Big Shot yet, you need one. Here is another idea that you can use your Big Shot for. I made this little Butterfly mobile out of soft drink cans. I then put them through the big shot with one of Stampin' Up!'s textured plates. The ideas are endless.
How cute. If you want anymore information on the Big Shot and our exclusive dies and textured plates, contact me today.
Happy Stampin"
Cheryl
Thursday, April 21, 2011
Tuesday, April 12, 2011
12 x 12 Layouts
I have had a little time to catch up on some Scrap-booking. People who know us will know that these photos are old, so I need to do some catching up. All the following pages have been completed with Stampin' Up! products, so no need to go runninng about Scraps stores, you can purchased everything required through me. email nyobre@aapt,net.au or go to www.nyobre.stampinup.net
This first layout is of Maddi on her first trip to Springfield Lakes Qld. We went to the Gold Cost theme Parks, this being Sea World.
With Tom & Jerry.
The next one is created with the Circle Scissors Plus. A great tool that you can cut loads of different size circles.
Close up of the detail on the circles.
More Circle Scissors.
Maddi's favorite ride, she loved flying down on the log ride, also though the Dolphins were so clever.
This first layout is of Maddi on her first trip to Springfield Lakes Qld. We went to the Gold Cost theme Parks, this being Sea World.
With Tom & Jerry.
The above layout is of Maddi when she really didn't want her photo taken. Turned out pretty cute though
The following 2 layouts are back to Sea World. The bottom is a close up of how I created the fence posts, and note the wood grain on them. Used one of our background stamps for this.The next one is created with the Circle Scissors Plus. A great tool that you can cut loads of different size circles.
Close up of the detail on the circles.
More Circle Scissors.
Maddi's favorite ride, she loved flying down on the log ride, also though the Dolphins were so clever.
Don't forget the New Autumn/Winter mini has just been released and there are some wonderful products and Stamps for you to purchase and have loads o;f fun with. See mini on side bar.
Happy Stampin' Cheryl
Sunday, April 10, 2011
Ornament Punch Roses
I was shown this wonderful idea by my upline Donna Krelle. When I saw it I just had to make one myself. Here is a link the a video http://www.youtube.com/watch?v=74YcAcgZE9k
This is my first go at making this rose and put it onto an easel card.
I was very impressed with this technique, and even my grand-daughter Maddi, (10yrs) has created 3 roses, and she is very excited with them. I tried to make my rose a Double Delight, only if it could smell as good.
Take the time to have a go, you will be very happy with the result.
Happy Stampin' Cheryl
Thursday, July 15, 2010
New Blog
Hi Everyone,
I have been very slack at blogging. I am trying to get my Stampin' Up! blog going and use only that one. http://www.stampinup.net/esuite/home/nyobre/blog
Hopefully by click on the link above you will be directed to my Stampin' Up! blog. I am a little rusty as this new one but working on it. Hopefully I will see on the new one.
Happy Stampin'
Cheryl
I have been very slack at blogging. I am trying to get my Stampin' Up! blog going and use only that one. http://www.stampinup.net/esuite/home/nyobre/blog
Hopefully by click on the link above you will be directed to my Stampin' Up! blog. I am a little rusty as this new one but working on it. Hopefully I will see on the new one.
Happy Stampin'
Cheryl
Thursday, May 13, 2010
Stationery Box
I received one of these wonderful Stationery Box for my birthday, full with wonderful cards, notes and tags. One of my very talented Stamp Club members, Jo, made it for me. I was so delighted with it, and at how beautiful it was, I decided to finally have a go myself.
This is a flower that I made myself , here is the link, so you can make one also. http://www.splitcoaststampers.com/resources/tutorials/dimensionalflowers/
This is a pretty decoration for the front.
This is the flower on the inside of the box. This one is a lot smaller.
These are the tags for inside the box
Four little love notes and envelopes.
Four cards, all made from a couple of pieces of DSP from Stampin' Up!
The Stationery Box open
Close up of the Address Book, Stamps and little flower.
The lot altogether.
Closed Box.
You can find this tutorial from Amy Celona website www.ustamp4fun.com
This tutorial is made from USA size papers and a little small for Aussie envelopes and cards.
Adjustments I made, after I made the box. When you download from Amy's site the adjustments will make sense.(Score at 5" & 7" on one side, 2 3/4" & 9 1/4" on the other score bottom at 3/4" 7 11 1/4")
I would like to thank Jo so very much for her beautiful gift and the inspiration to make my own. My Mother and Mother-in-law both received one of these for Mothers Day.
Have a go now and you will be very happy with the end result.
Happy Stampin' Cheryl
This is a flower that I made myself , here is the link, so you can make one also. http://www.splitcoaststampers.com/resources/tutorials/dimensionalflowers/
This is a pretty decoration for the front.
This is the flower on the inside of the box. This one is a lot smaller.
These are the tags for inside the box
Four little love notes and envelopes.
Four cards, all made from a couple of pieces of DSP from Stampin' Up!
The Stationery Box open
Close up of the Address Book, Stamps and little flower.
The lot altogether.
Closed Box.
You can find this tutorial from Amy Celona website www.ustamp4fun.com
This tutorial is made from USA size papers and a little small for Aussie envelopes and cards.
Adjustments I made, after I made the box. When you download from Amy's site the adjustments will make sense.(Score at 5" & 7" on one side, 2 3/4" & 9 1/4" on the other score bottom at 3/4" 7 11 1/4")
I would like to thank Jo so very much for her beautiful gift and the inspiration to make my own. My Mother and Mother-in-law both received one of these for Mothers Day.
Have a go now and you will be very happy with the end result.
Happy Stampin' Cheryl
Wednesday, May 12, 2010
All in the Family
More Family scrapping.
I thought All in the Family stamp set suited this shot very well. Everyone had a great time, the kids all playing, swimming and fishing.
Stamp Set: All in the Family, Family Favorites and Family Phrases
Card Stock: Basic Black textured, Sahara Sand, Whited White
Ink: Shara Sand, Basic Grey, Going Grey
Accessories: Black Grosgrain Ribbon, Double Rectangle Punch, Word Window Punch & dimensionals
This is another very simply page, but tells its own story.
Happy Stampin'
Cheryl
I thought All in the Family stamp set suited this shot very well. Everyone had a great time, the kids all playing, swimming and fishing.
Stamp Set: All in the Family, Family Favorites and Family Phrases
Card Stock: Basic Black textured, Sahara Sand, Whited White
Ink: Shara Sand, Basic Grey, Going Grey
Accessories: Black Grosgrain Ribbon, Double Rectangle Punch, Word Window Punch & dimensionals
This is another very simply page, but tells its own story.
Happy Stampin'
Cheryl
Scrapping Family Shots
Continuing to Scrap Family shots.
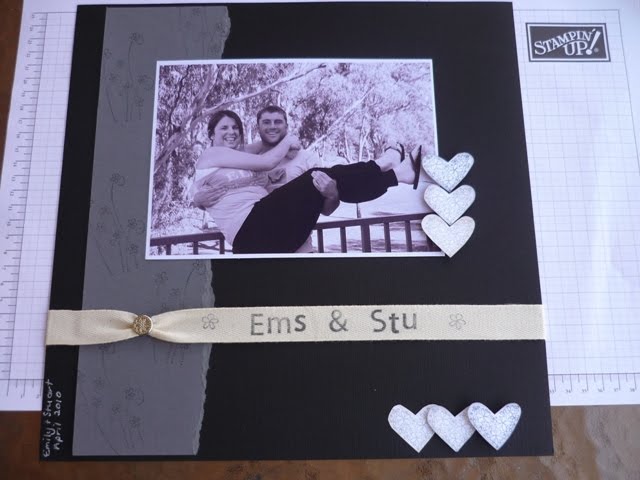
Staying with the natural colours whilst using black and white photos, I feel this gives a simple, but effective way to scrap.
This is Emily and her soon to be husband Stuart. This was taken when we all went away for the week end to Echuca.
Stamps: Simply Said, Short order alphabet.
Card Stock: Basic Black Textured, Basic Grey, Whisper White
Ink: Basic Grey, Going Grey, Sahara Sand
Accessories: Twill, Silver Hodgepodge hardware, sponges, dimensionals, White gel pen
Technique: Tearing.
I stamped their names straight onto the twill, very easy and effective.
Happy Stampin'
Cheryl
Staying with the natural colours whilst using black and white photos, I feel this gives a simple, but effective way to scrap.
This is Emily and her soon to be husband Stuart. This was taken when we all went away for the week end to Echuca.
Stamps: Simply Said, Short order alphabet.
Card Stock: Basic Black Textured, Basic Grey, Whisper White
Ink: Basic Grey, Going Grey, Sahara Sand
Accessories: Twill, Silver Hodgepodge hardware, sponges, dimensionals, White gel pen
Technique: Tearing.
I stamped their names straight onto the twill, very easy and effective.
Happy Stampin'
Cheryl
Subscribe to:
Posts (Atom)
Stamping One Sheet Wonders
Hello Stampers, This is a follow up from my August Online Class, with this fun technique. I absolutely love this type of stamping. Love to ...
-
Welcome to an ESAD blog hop. You may have arrived to my blog from my fellow Stampin Up! Demonstrator friend Rachel . The theme o...
-
Welcome to Kelly's Friends Blog Hop, showcasing HAPPY. Firstly I would like to congratulate Kelly on her 5th year anniversary with ...
-
"H Welcome to another ESAD blog hop. This is all about show casing some wonderful products from our new occasions catalogue that has ...