Our new Stampin' Blends are here. Checkout this video
iframe width 480 height 270 src https://www.youtube.com/embed/9IRkZm2vZSE frameborder 0 gesture media allowfullscreen> /iframe>

Wednesday, November 1, 2017


Monday, October 16, 2017
Stampin' Up - Baby wipe technique
Hello Everyone,
Just wanted to share with you a layout I did using the Baby Wipe Technique. I taught this class this week, and told my class participants how great it would be for a scrap layout. So I needed to produce the goods for them to see.
I have got a little bit clever now, doing the pages in multiples so I get each grandchild's album done.
This first layout I used the colours, Tangerine Tango, Calypso Coral, and Blushing Bride. Leaves are done in Pear Pizzazz, stamped off, and then full colour for the leaf veins. Garden in Bloom is a great stamp set, and used it in all 3 layouts. The die cut Lovely, came from the Lovely word thinlits.

On the pop up flowers, the faceted gems give this page a highlight.

The inks used in these 2 layouts are, Night of Navy, Marina Mist, Soft Sky. Petra Pizzazz again for the leaves. The wording Sweet came from the Cupcake Cutouts Framelits. Faceted gems used again on both layouts.

The Baby wipe technique is super simple, and very effective. I have started these classes just recently, with participants do a quick sample, then they make a card after their practice, and paste into a booklet with direction, so will have this as a reference for future card making/scrap making days.
Thanks for checking in,
Happy Stampin'
Cheryl
Tuesday, July 18, 2017
Beach Play Scrap Layout - Stampin' Up!
Lola's holiday continues. Enjoying a play on the Maroochydore Beach with her little sister Ivy. Co-ordinated the Color Theory memories and more cards with our designer series paper and cardstock. Used a few different stamps for the sentiments, and the framelits for the big waves. I used the paste for the waves in the back ground. To make these waves I used the Swirly Scribble Thinlits as a template to apply the paste. Great memories,
Happy Stampin'
Cheryl
Memories and More with Stampin' Up! Lola's holiday snaps.
Wow, how easy is it to great some memories completed with these wonder packs from Stampin' Up!. This pack is Color theory memories and more card pack. I just added a little stamping, and 2 pages completed.
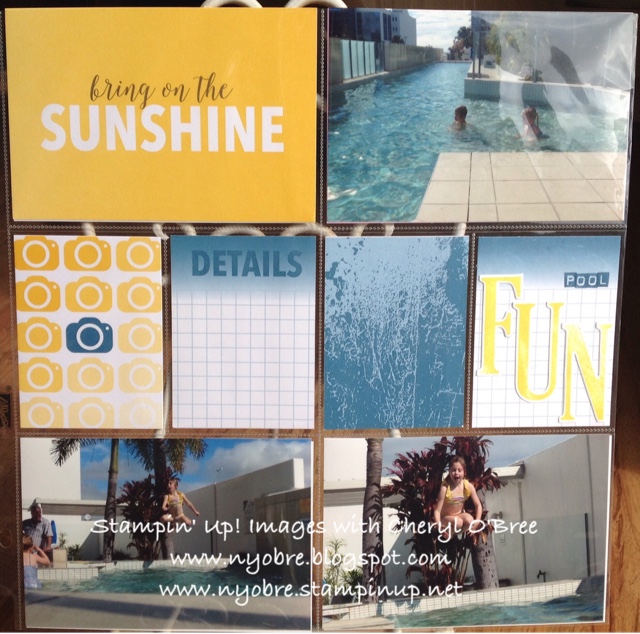
 I think I completed these within a half an hour. That's amazing for me.
All I need now is Lola to write her thoughts on her activities.
These layouts show how alphabet stamps and framelits are a must for a scrap booker.
Very happy with both layouts.
Now it's your turn, if you want any info, please give me a call, email or just comment below.
Happy Stampin'
Cheryl
Fanfare Fold Card - Stampin' Up!
Loving having a couple of days off to play with new products. No housework today. This little card is fun and easy to create. I found this idea from Lyssa Griffin Zwolanek.

Give this card a go, you will be able to create many different ones.
Base piece of card stock - 4 1/8". X. 5 3/4". ( 1/4 piece of A4 sheet)
I then embossed with the new garden trellis embossing folder.
Then cut a piece of soft sky piece of card stock 4 3/8". X. 3 1/4"
Then cut the fold piece in blushing bride 4 1/8". X. 11"
Scored that piece along the 11" side at 1 1/2", 3", 5 1/2" and 8"
Fold mountain valley
I used the birthday memories designer series paper, cutting at 1 1/4". X. 3 7/8", 2 1/4". X. 3 7/8" and lastly 2 3/4". X. 3 7/8"
I cut 1 piece of whisper white at 2 1/4". X. 3 7/8" then stamped with the birthday delivery stamp set.
For the greeting I used paint play stamp set ( 1 of my favourites) and the 2nd oval from the stitched shape framelits.
Enjoy.
Happy Stampin'
Cheryl
Monday, July 17, 2017
Multi-flip card Tutorial.
Hi Everyone , been asked by several for a tutorial on a card I created for my grand-daughter. I have never done one before so I hope you can understand it. I have looked everywhere for the card I was inspired by but can't find it anywhere. 

Inside.


Take 1 of those pieces and score at 4 1/8" Then move the whole piece of card stock so the scoreline, lines up with the 5" mark
 Then you will need to score every 3/4" right to the end.
  There will be this much to much, just cut off so the last bit measures 3/4".
 Take the second piece of card stock that measures 5 3/4. X A4 and start to score from the beginning every 3/4" x5 times.
 You will need to cut the excess off. So line the last score line up with the 4 1/8" mark. And then cut the rest off. This should measure the same as the the large area on the first piece. These create front and back of card.
 So you need to fold valley then mountain, and then you stick both pieces together.
 Joined together. This card has 7 flips
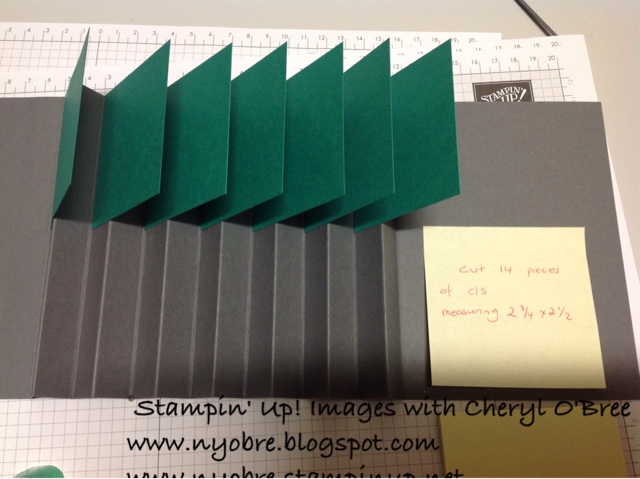 Adding flips, cut 14 pieces of card stock 2 3/4". X. 2 1/2"
 Stick the top flips on to the left side of the mountain, level at top of card.
 Stick the bottom pieces onto the backside of the mountain. (Oops I wrote right side on note for top it's the left sorry)
 All pieces in place.
 Bottom view
 If you want to decorate or emboss these pieces this is the time to do it, before you stick them on.
 Cut 3 pieces of card stock, 1 - Front, 1 - inside front, and 1 - inside back. I used coloured card stock for front and w/w for inside pieces. Cutting size 5 1/2". X 3 7/8"
 Before putting on front cover, you will need to measure ribbon. Wrap it around you card, the ribbon keeps your card together.
 Attached ribbon under the card stock for front.
 Inside of card. Attach the inside front and back pieces. Decorate how ever you like.
Here's my grand-daughters card firstly.
Front of card
Tutorial
Firstly cut 2 pieces of card stock 5 3/4" x length of A4 sheet.
You can make this card have fewer flips or more, you just to more or less scoring.
Cut 14 pieces of co-ordinating card stock.
Hope you understand these photos and you enjoy creating your own flip card. Please post some of your card and tag me into them so I can see them
Happy Stampin'
Cheryl
Friday, June 23, 2017
Retreat Thank You cards
Wow, we had our first ever team retreat a couple of weeks ago. It was great, and we all had the best time, meeting each other for the first time and creating fabulous projects. I never had created so many projects in so little time all at once. Can't wait for the the next one. It was so successful that we are making it an annual event.
 Cheryl Algie created this lovely card. Thank you Cheryl its is lovely, and such a great treat to have a fluttering butterfly. A must have set.
I just received these 2 beautiful cards from my wonderful down line.
Lyn Sambell created this first card. Just love it Lyn thanks so much. But it was truly a pleasure to help with organising the retreat with Pam
Looking forward to our next retreat with our team. So if you missed out this time, you will want to be aboard next year, so much fun.
Happy Stampin'
Cheryl
Subscribe to:
Posts (Atom)
Stamping One Sheet Wonders
Hello Stampers, This is a follow up from my August Online Class, with this fun technique. I absolutely love this type of stamping. Love to ...

-
 Welcome to an ESAD blog hop. You may have arrived to my blog from my fellow Stampin Up! Demonstrator friend Rachel . The theme o...
 -
Welcome to Kelly's Friends Blog Hop, showcasing HAPPY. Firstly I would like to congratulate Kelly on her 5th year anniversary with ...
-
 "H Welcome to another ESAD blog hop. This is all about show casing some wonderful products from our new occasions catalogue that has ...
